Contents

4.3 Groups of signals
This section explains how to create and to use groups of signals. Groups of signals can be created only within the framework of a database. When files are loaded individually this operation is not permitted. The reasons for using groups are explained here. Groups are simply lists of signals referenced by their unique signal ID. The original order of signals at the group creation is always preserved. This section presents also the "drag and drop" mechanism used to associate signals.
Groups are saved in the database directory under files named ".group". These are binary files with the list of signal IDs. The list of groups is stored in the file ".grouplist". Only one exists per database. The files are modified or created only when the database is saved (see 4.2. Create, Open, Close and Save).
Selecting signals
As detailed in section Signal viewers, they are three ways of viewing signals: tables, graphics and maps. Each viewer is associated with a sub set of signals. Here, we use the "table" viewer to explain the "drag and drop" mechanism. The specificities of the "drag and drop" for each viewer are explained in section Signal viewers.
You can select the signals on a file basis with the "Files" list, or on a group basis with the "Groups" list. In both cases, press SHIFT or CTRL key to create complex selections. "All files" and "All groups" represent all signals (except the temporary signals, see Basic signal processing) and the union of all groups, respectively. Press the mouse left button on the selection and move the pointer towards a viewer icon in the tool bar (e.g. the table icon is  ). Release the mouse button, a table will be created containing the selected signals.
In a table, you can select various signals with SHIFT and CTRL keys. Press the mouse left button on a selected row and move the pointer again to the table icon. A new table is created with the restricted selection. A signal may appear several times in a single viewer. You can drop signals into an existing table, the new signals will be added at the end.
Sorting signals
To select signals, it may be interesting to sort the list of signals. For instance, if you want to select all the signals measured on the vertical component, first create a table with all signals. Sort the signals by component and select the block of signals with the vertical component.
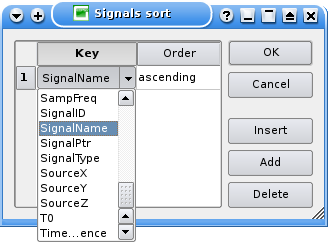
Figure 1: Dialog box that lets you sort the signal in a viewer.
Sorting can be done in the active viewer by selecting item "Sort" in menu "Edit". The "Edit" menu always apply to all signals of the active viewer. A dialog box as shown in figure 1 will be displayed.
The selected keys are listed in the two-column table (Key and Order). Available keys are listed in the combo box at the bottom. Check or uncheck the "Descending order" checkbox as necessary and click on "Add" button to add a key to the sort. To use "Delete" or "Insert", you must select one row of the table. "Insert" will insert the new key right before the selected key. Hit "Delete" several times to remove all keys. After clicking on "OK", the list of keys are stored and the signals of the active viewer are sorted.
Though multiple keys of the same kind are possible, it is totally useless. Moreover, using multiple keys has an effect only when there are equal values in the first keys.
Creating a new group
There must be an active viewer. If it is not the case, create one as described in the preceding sections. Select item "New group" from menu "Edit". A simple dialog box lets you enter a name for the group. All types of names are accepted (blanks, accents, ...). If the name of the group already exists in the database, you will be prompted to overwrite the existing one. The new group is added to the "Groups" list. The ".group" file containing the list of IDs is directly written to the disk. However, the ".grouplist" file will be effectively written on the disk once the database is saved.
Viewing groups
Groups are manipulated in the same way as files with the drag and drop mechanism described here above.
Renaming a group
Select only one group (not the first one "All groups"). Click on the right mouse button. In the context menu select "Rename". Type the new name in the simple dialog box and hit "OK". The ".group" file corresponding to the group is directly renamed, but the ".grouplist" file is not affected. Do not forget to save the database to avoid any loss of the ID list belonging to this group. This situation may be repaired by renaming manually the ".group" file to its original name.
Modifying a group
Create a viewer (e.g. a table) with the group. Modify its content (sorting, adding new signals, ...). Select "New group" in menu "Edit" and enter the name of the existing group. The original group will be overwritten. Saving the database in this case is not necessary but strongly advised to avoid confusions with the other actions.
Deleting groups
Select one of more groups and choose "Remove" from the context menu (after a right click in the "Groups" list"). ".group" files are directly removed from the database directory, hence this action cannot be cancelled. Saving the database is mandatory if you do not want to pollute the "Groups" list with empty defunct groups.
